Authentication and authorization are critical in every software application to secure user data and allow access to trusted users. In some cases, implementing authentication and authorization is not an easy process.
However, LoopBack 4 offers an authentication package @loopback/authentication that helps secure your application's API endpoints. It provides custom authentication strategies and a @authenticate decorator that requires minimal boilerplate code.
What is LoopBack?
According to the LoopBack 4 documentation:
LoopBack is a flexible, open source Node.js and TypeScript framework built on Express. It helps you quickly develop APIs and microservices built on backend systems such as databases and SOAP or REST services.
Loopback provides several features that allow you to build your application with less boilerplate code.
What is JSON Web Token (JWT)?
JSON Web Token (JWT) is an open standard defined by Internet Engineering Task Force (IETF) in RFC 7519.
It is a standard used for securely transferring claims between two parties over the internet. It uses JSON Web Signature (JWS) for the secure transfer of claims and eliminates the possibility of tampering. Accordingly, JWTs can be signed with either a secret (HMAC technique) or a public/private key pair (RSA or ECDSA).
In simple words, it is used for authentication and secure information sharing. A JWT token is made up of three components that are separated by three dots:
- Header: The header is made up of two parts — the kind of token, which is JWT; the signature technique used, either HMAC SHA256 or RSA.
- Payload: The payload is the token, which includes the claims. Claims are assertions about an entity that provides extra information.
- Signature: The encoded header, encoded payload, a secret, and the algorithm provided in the header comprise the signature.
You can learn more about JWT and its best practices here.
Prerequisites
This tutorial is a hands-on demonstration. To follow along, be sure you have the following in place:
- A Linux machine — This tutorial will use Ubuntu 20.04.3 LTS (Focal Fossa). The tutorial also works well on other Linux distributions and operating systems.
- NodeJS — JavaScript runtime built on Chrome's V8 JavaScript engine.
- MongoDB — Document-oriented database program.
Install LoopBack CLI
To start building your LoopBack REST API, first install LoopBack CLI, which provides the quickest method to create a LoopBack 4 project that follows best practices.
Use the command below to install the Loopback CLI globally:
npm i -g @loopback/cliYou can grab a cup of coffee while you wait for the installation to complete. Then open your command line, create an AuthWithLooback folder, and change the directory to the AuthWithLooback folder with commands below:
mkdir AuthWithLooback
cd AuthWithLooback
Scaffold Your LoopBack Project
So, you've installed Loopback CLI and created a project directory. Let's run the following command to create a LoopBack project:
lb4 appSelect the options as in the following screenshot to complete the prompts.

After completing the prompts, LoopBack will configure the TypeScript compiler and install all the required dependencies. Change directory to the auth-with-loopback folder.
cd auth-with-loopbackCreate a Model
You've successfully created your Loopback application. Now, let’s create a Model to store the news details with the command below:
lb4 modelSelect the options as in the following screenshot to complete the prompts.
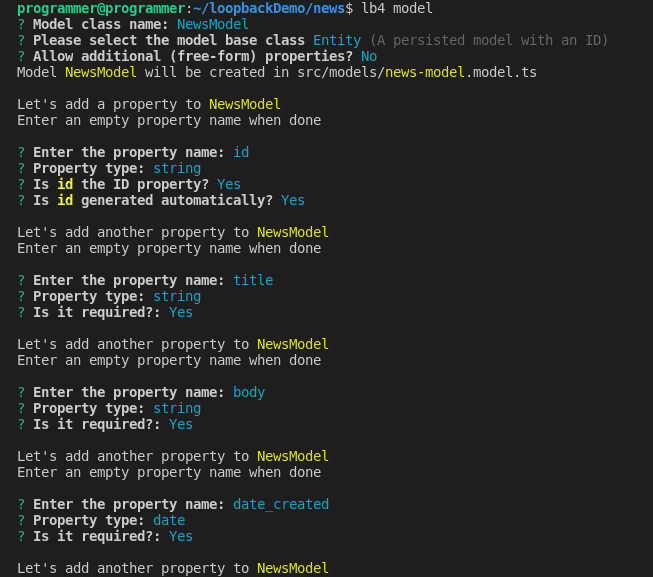
After the date_created property definition, press the enter key to exit the prompt.
Loopback will create a NewsModel file in the src/models — the folder where NewsModel will be defined.
Next, you need to create a data source to connect to your preferred database. For demonstration, this tutorial connects to a MongoDB database.
Run the following command in your terminal to create a data source:
lb4 datasourceSelect the options as in the following screenshot to complete the prompts.

After completing the prompts, LoopBack will create the News file in the src/datasource folder.
Then, create a Repository for CRUD operations of your NewModel with the command below:
lb4 repositoryAfter completing the prompts, LoopBack will create the NewsModelRepository file in the src/repository folder.
Select NewsDatasource as the data source, NewsModel as the model for generating the repository, and DefaultCrudRepository as the base repository class.
Your selection for the prompts shall look like the screenshot below.

After completing the prompts, LoopBack will create the NewsModelRepository file in the src/repository folder.
Lastly, create a controller for the NewsModel you created with the command below:
lb4 controllerYour selection for the prompts should look like the screenshot below.

After completing the prompts, LoopBack will create the NewsController file in the src/controller folder. So far, your project structure, omitting the node_modules folder, should look as follows.
📦auth-with-loopback
┣ 📂public
┃ ┗ 📜index.html
┣ 📂src
┃ ┣ 📂tests
┃ ┃ ┣ 📂acceptance
┃ ┃ ┃ ┣ 📜home-page.acceptance.ts
┃ ┃ ┃ ┣ 📜ping.controller.acceptance.ts
┃ ┃ ┃ ┗ 📜test-helper.ts
┃ ┃ ┗ 📜README.md
┃ ┣ 📂controllers
┃ ┃ ┣ 📜README.md
┃ ┃ ┣ 📜index.ts
┃ ┃ ┣ 📜news-controller.controller.ts
┃ ┃ ┗ 📜ping.controller.ts
┃ ┣ 📂datasources
┃ ┃ ┣ 📜README.md
┃ ┃ ┣ 📜index.ts
┃ ┃ ┗ 📜news.datasource.ts
┃ ┣ 📂models
┃ ┃ ┣ 📜README.md
┃ ┃ ┣ 📜index.ts
┃ ┃ ┗ 📜news-model.model.ts
┃ ┣ 📂repositories
┃ ┃ ┣ 📜README.md
┃ ┃ ┣ 📜index.ts
┃ ┃ ┗ 📜news-model.repository.ts
┃ ┣ 📜application.ts
┃ ┣ 📜index.ts
┃ ┣ 📜migrate.ts
┃ ┣ 📜openapi-spec.ts
┃ ┗ 📜sequence.ts
┣ 📜.dockerignore
┣ 📜.eslintignore
┣ 📜.eslintrc.js
┣ 📜.gitignore
┣ 📜.mocharc.json
┣ 📜.prettierignore
┣ 📜.prettierrc
┣ 📜.yo-rc.json
┣ 📜DEVELOPING.md
┣ 📜Dockerfile
┣ 📜README.md
┣ 📜package-lock.json
┣ 📜package.json
┗ 📜tsconfig.json
Add Custom Data
Now that you have the Model setup, run the server, and add some custom data to the News collection in MongoDB.
    #start the server
    npm run start
The above command will start the TypeScript compiler, which will build the project and check for possible errors. If everything goes well with the code, you should see the output on the terminal, as follows:
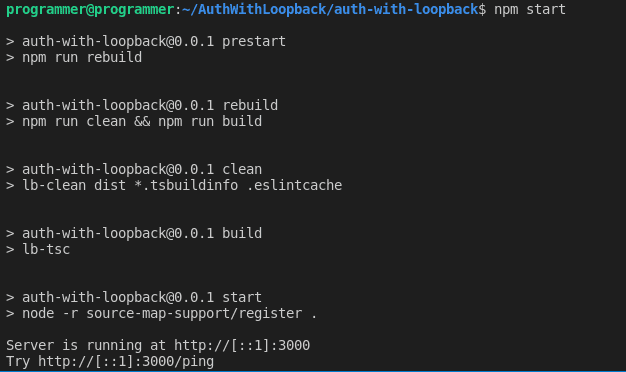
Next, open your favorite browser and navigate to localhost:3000. You should see an output as follows:
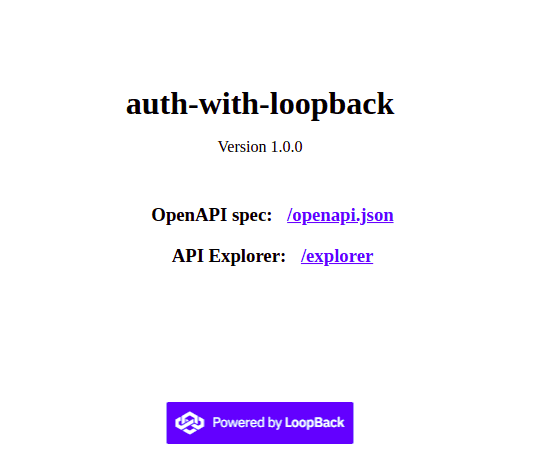
Now, click on the explorer link, where you can make requests to your LoopBack application. On the explorer page, locate the post endpoint and add some custom data to the news collection by clicking the try it out button with the data below on the request body.
{
  "title": "Upgrade to Loopback V4",
  "body": "The developers of Loopback urges the V3 users to upgrade to V4 as soon as possible",
  "date_created": "2021-12-14T00:57:43.197Z"
}
Then, click the execute button to run the query.
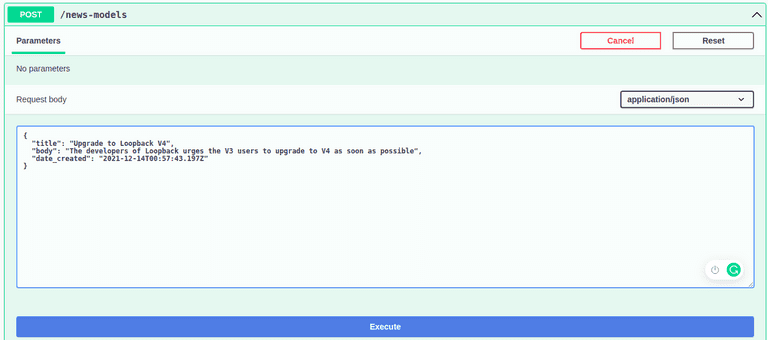
You can add as many records as you like to experiment with the endpoints. The important thing to note here is that the endpoints are not protected. Anyone may create, read, update, and delete records.
In a moment, this tutorial explains how to secure the endpoints so that only logged-in users can access them.
To begin, install LoopBack authentication and authentication-jwt, as follows:
npm i --save @loopback/authentication @loopback/authentication-jwtSetup Authentication Components
To protect the application, you'll implement user authentication and authorization, which implies that only logged-in users will be able to access your APIs. You'll create two endpoints in the User controller:
/Signupendpoint: To handle user’s sign up./Loginendpoint: To handle user’s login.
Create Your Signup Endpoint
You’ll start with the signup controller to enable users to create an account. Create an empty controller with the command below:
lb4 controllerYour selection for the prompts should be as follows:

Then, open the src/controllers/user.controller.ts file, and import the required modules with the following code snippet:
    import { authenticate, TokenService } from '@loopback/authentication';
    import {
      Credentials,
      MyUserService,
      TokenServiceBindings,
      User,
      UserRepository,
      UserServiceBindings,
    } from '@loopback/authentication-jwt';
    import { inject } from '@loopback/core';
    import { model, property, repository } from '@loopback/repository';
    import {
      get,
      getModelSchemaRef,
      post,
      requestBody,
      SchemaObject,
    } from '@loopback/rest';
    import { SecurityBindings, securityId, UserProfile } from '@loopback/security';
    import { genSalt, hash } from 'bcryptjs';
    import _ from 'lodash';
    ........
Next, set up your user credential objects, and verify the user credentials using the UserService, injecting MyUserService into the authentication-jwt extension.
    @model()
    export class CreateUser extends User {
      @property({
        type: 'string',
        required: true,
      })
      password: string;
    }

    const UserSchema: SchemaObject = {
      type: 'object',
      required: ['email', 'password'],
      properties: {
        email: {
          type: 'string',
          format: 'email',
        },
        password: {
          type: 'string',
          minLength: 6,
        },
      },
    };

    export const RequestBody = {
      description: 'The input of login function',
      required: true,
      content: {
        'application/json': { schema: UserSchema },
      },
    };

    export class UserController {
      constructor(
        @inject(TokenServiceBindings.TOKEN_SERVICE)
        public jwtService: TokenService,
        @inject(UserServiceBindings.USER_SERVICE)
        public userService: MyUserService,
        @inject(SecurityBindings.USER, { optional: true })
        public user: UserProfile,
        @repository(UserRepository) protected userRepository: UserRepository,
      ) { }
    ..........
Finally, you'll build your signup endpoint, which will listen to POST requests. Here, you shall save the hashed version of the user's password in the database to keep it safe.
     @post('/signup', {
      responses: {
        '200': {
          description: 'User',
          content: {
            'application/json': {
              schema: {
                'x-ts-type': User,
              },
            },
          },
        },
      },
    })
    async signUp(
      @requestBody({
        content: {
          'application/json': {
            schema: getModelSchemaRef(CreateUser, {
              title: 'NewUser',
            }),
          },
        },
      })
      newUserRequest: CreateUser,
    ): Promise<User> {
      const password = await hash(newUserRequest.password, await genSalt());
      const savedUser = await this.userRepository.create(
        _.omit(newUserRequest, 'password'),
      );

      await this.userRepository.userCredentials(savedUser.id).create({ password });

      return savedUser;
    }
    .........
Create Your Login Controller
Now that you've set up the signup endpoint, create the login endpoint so that registered users may log in to the API.
Using the code snippet below, set up the login route in the src/controllers/user.controller.ts file. In the event of a successful log-in, a token is sent to the user.
      @post('/signin', {
      responses: {
        '200': {
          description: 'Token',
          content: {
            'application/json': {
              schema: {
                type: 'object',
                properties: {
                  token: {
                    type: 'string',
                  },
                },
              },
            },
          },
        },
      },
    })
    async signIn(
      @requestBody(RequestBody) credentials: Credentials,
    ): Promise<{ token: string }> {
      const user = await this.userService.verifyCredentials(credentials);
      const userProfile = this.userService.convertToUserProfile(user);
      const token = await this.jwtService.generateToken(userProfile);
      return { token };
    }
Perhaps, you can show the currently logged-in user by adding a /whoami endpoint.
In the src/controllers/user.controller.ts file, get the details of the currently logged-in user using the code snippet below. Users should access this endpoint only when they are logged in.
      @authenticate('jwt')
      @get('/whoami', {
        responses: {
          '200': {
            description: 'Return current user',
            content: {
              'application/json': {
                schema: {
                  type: 'string',
                },
              },
            },
          },
        },
      })
      async whoAmI(
        @inject(SecurityBindings.USER)
        loggedInUserProfile: UserProfile,
      ): Promise<string> {
        return loggedInUserProfile[securityId];
      }
Now, open src/application.ts and bind the authentication components to your application class. First, import Loopback AuthenticationComponent, JWTAuthenticationComponent, and NewsDataSource from your datasources using the following code snippet:
//...
import { AuthenticationComponent } from "@loopback/authentication"
import {
  JWTAuthenticationComponent,
  UserServiceBindings,
} from "@loopback/authentication-jwt"
import { NewsDataSource } from "./datasources"
//...
Then, mount the jwt authentication system and bind your NewsDataSource to the UserService data source.
//...
// ------ ADD SNIPPET INSIDE THE CONTRUCTOR BLOCK ---------
this.component(AuthenticationComponent)
this.component(JWTAuthenticationComponent)
this.dataSource(NewsDataSource, UserServiceBindings.DATASOURCE_NAME)
//...
Finally, add the authenticate action in the Sequence. Also, modify the error when authentication fails to return status code 401 (Unauthorized). Open the src/sequence.ts file and add the code snippet below:
    import { FindRoute, InvokeMethod, MiddlewareSequence, ParseParams, Reject, RequestContext, Send, SequenceActions, SequenceHandler } from '@loopback/rest';
    import {
        AuthenticateFn,
        AuthenticationBindings,
        AUTHENTICATION_STRATEGY_NOT_FOUND,
        USER_PROFILE_NOT_FOUND,
    } from '@loopback/authentication';
    import { inject } from "@loopback/core"
    export class MySequence implements SequenceHandler {
        constructor(
            @inject(SequenceActions.FIND_ROUTE) protected findRoute: FindRoute,
            @inject(SequenceActions.PARSE_PARAMS)
            protected parseParams: ParseParams,
            @inject(SequenceActions.INVOKE_METHOD) protected invoke: InvokeMethod,
            @inject(SequenceActions.SEND) protected send: Send,
            @inject(SequenceActions.REJECT) protected reject: Reject,
            @inject(AuthenticationBindings.AUTH_ACTION)
            protected authenticateRequest: AuthenticateFn,
        ) { }
        async handle(context: RequestContext) {
            try {
                const { request, response } = context;
                const route = this.findRoute(request);
                //call authentication action
                await this.authenticateRequest(request);
                // Authentication successful, proceed to invoke controller
                const args = await this.parseParams(request, route);
                const result = await this.invoke(route, args);
                this.send(response, result);
            } catch (error) {
                if (
                    error.code === AUTHENTICATION_STRATEGY_NOT_FOUND ||
                    error.code === USER_PROFILE_NOT_FOUND
                ) {
                    Object.assign(error, { statusCode: 401/* Unauthorized */ });
                }
                this.reject(context, error);
                return;
            }
        }
    }
Protect News Endpoints
So far, you've implemented user authentication for your API. Now, protect your News endpoints so that only authenticated users can access those routes.
Open the src/controllers/news.controller.ts file, and import authenticate from jwt authentication.
import { authenticate } from "@loopback/authentication"Then on each of the endpoints in your news controller, add @authenticate('jwt') before the NewsController class, which will protect all the routes in NewsController.
    //...
    @authenticate('jwt')
    //...
Perhaps, you may not want to protect all the routes, simply add the @authenticate('jwt') method before the route you wish to protect. You can protect the POST route as follows:
    @authenticate('jwt')
    @post('/news-models')
      @response(200, {
        description: 'NewsModel model instance',
        content: { 'application/json': { schema: getModelSchemaRef(NewsModel) } },
      })
      async create(
        @requestBody({
          content: {
            'application/json': {
              schema: getModelSchemaRef(NewsModel, {
                title: 'NewNewsModel',
                exclude: ['id'],
              }),
            },
          },
        })
        newsModel: Omit<NewsModel, 'id'>,
      ): Promise<NewsModel> {
        return this.newsModelRepository.create(newsModel);
      }
Test Your Application
You've implemented user authentication in your REST API and secured the routes against unauthorized users. Let's put your application to the test. Press CTRL-C to exit the server and restart it with the following command:
npm startIf you open the explorer page, you should see the UserController endpoints.

If you try to execute any query on NewsController, you get a 404 (Unauthorized) error. So, sign up by clicking the /signup endpoint — and log in from the /users/login endpoint. On successful login, copy the token, scroll to the top, click on the Authorize button, and paste the token.
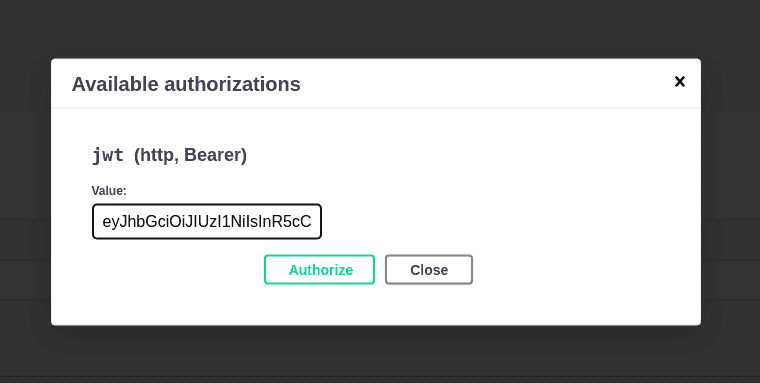
Now you can execute queries on the NewController endpoints.
User Authentication with Loginradius
LoginRadius is a customer identity and access management (CIAM) platform for developers.
What does this mean for developers like you?
LoginRadius simplifies the process of user authentication, authorization, and management across web and mobile apps and APIs. It helps developers quickly implement this functionality so that developers, like you, can focus more on building core features that are essential to their apps.
Loginradius includes a plethora of enticing CIAM features such as passwordless authentication and social SSO (Twitter, Facebook, etc., based single sign-on).
Implementing user authentication with LoginRadius is a simple procedure. First, sign up for a Developer Pro trial or simply sign up for a forever free account here.
And you can explore what LoginRadius can do by using it for a Node.js application. You can learn more by going through LoginRadius Node.js developer documentation
Conclusion
This tutorial taught you how to create user authentication in a LoopBack REST API by creating a small news database application.
You can use the steps outlined in this tutorial to create any type of LoopBack REST API that requires user authentication and authorization.
I hope you enjoyed this tutorial! Feel free to contact me on Twitter.
